Imagine a quick pencil sketch of mountains. The closest peak stands sharp and bold. Far ones fade into a soft haze, pulling your eye deep into the scene.
Artists call this atmospheric perspective. It copies how air, dust, and moisture blur distant views in real life. You can add this depth trick with just blur and low contrast, no fancy skills needed.
You’ll get simple steps for digital tools or paints. Beginners grab paper and try it now. First, see why it works so well.
Why Atmospheric Perspective Makes Your Art Pop with Depth
Atmospheric perspective tricks the eye into sensing space. Nature softens far objects with haze. Close ones stay crisp and clear.
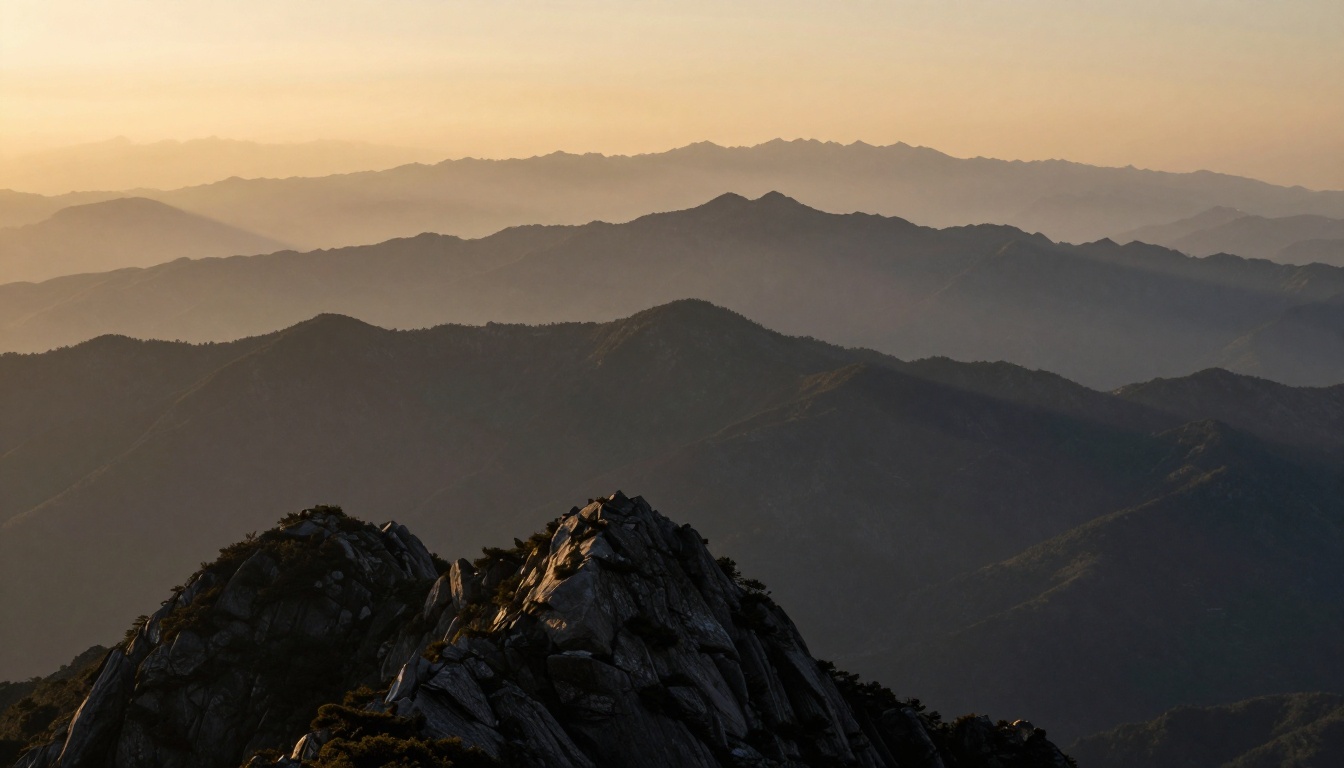
Think of a foggy valley. Trees up front show every leaf. Distant hills blend into gray tones. You feel miles of air between them. City skylines at dusk work the same way. Tall buildings nearby pop with detail. Horizon towers lose edges in the mist.
This method beats complex shading. You skip perfect lines or gradients. Blur and low contrast create instant recession. Viewers sense depth right away. Famous artists nailed it for lifelike results.
Leonardo da Vinci used haze in backgrounds. His scenes feel endless. You gain that power too, fast.
Observe It in Real Life for Instant Understanding
Step outside your door. Look at a row of trees. Nearby branches hold sharp outlines. Ones half a mile back soften and fade.
Drive to a beach next time. Horizon lines blur where sky meets water. Light scatters through particles. Blues shift to paler tones. Dust and vapor block fine details.
You see it daily without thinking. Mountains on a clear day still haze at the top. Recall that view. It trains your eye for art. Practice spotting layers: front sharp, back vague. This builds your feel for the effect.
Lessons from Famous Paintings
Da Vinci’s Mona Lisa background layers soft blues into distance. It draws you past her smile. Realism surges from that haze.
J.M.W. Turner painted stormy seas. Far waves dissolve in mist. Emotion builds as you scan deeper. He stacked low-contrast layers for drama.
These masters kept it simple. No heavy rendering back there. You copy their shortcut. Study prints online. Notice how foreground punches forward. It inspires your next sketch.
Add Distance with Smart Blur Techniques
Blur pushes shapes back fast. Your eye fights to parse far details in life. Art mimics that struggle.
Start light on mid-ground. Ramp up for true backgrounds. Subtle application keeps muddiness away. Foreground stays tack-sharp.
Digital users apply filters layer by layer. Painters soften with dry brushes. Both yield pro results. Practice on scrap paper first.
Choose Blur Amount Based on Distance
Scale it by layers. Near objects get 2 to 5 pixel radius in software. Mid gets 8 to 12. Far backgrounds hit 20 or more.
Picture three mountain ridges. Front one stays line-crisp. Middle softens just enough to recede. Back melts into sky.
In paints, use tiny brushes upfront. Switch to fat, feathery ones behind. Blend edges softly. Progression sells the space. Test on a value study. Adjust until distance clicks.
Blur Tools That Work in Any Medium
Photoshop’s Gaussian Blur filter shines. Duplicate layers first. Mask edges for control.
GIMP offers a free blur tool. Drag sliders for precision. Procreate users smudge with textured brushes.
Traditional artists grab cotton swabs. Rub dry paint gently. Fingers work on wet layers too. Keep paper towels handy.
Layers let you tweak without regret. Undo heavy spots easy. Build the habit. Your scenes gain air overnight.

This example shows blur progression in action.
Soften Scenes by Dropping Contrast Levels
Low contrast veils distant areas. Air mutes blacks and whites back there. Tones flatten into middle grays.
Pair it with desaturated colors. Far shapes turn hazy neutral. Foreground keeps full punch: deep shadows, bright lights.
Viewers follow your lead naturally. Eye rests forward, then drifts back. Balance sells the whole picture.
Easy Ways to Reduce Edge Sharpness and Vibrancy
In Photoshop, add a curves layer. Pull the curve flat in the middle. Compress highlights and shadows.
Painters thin colors with water. Blend into softer edges. Acrylics dry fast, so work quick.
Skip full gray. Hint of hue keeps life. Local tweaks beat global filters. Subtle shifts work best.
Create Smooth Shifts from Front to Back
Feather every change. Mid-ground holds medium contrast. Back goes lowest.
Sketch a value scale. Front spans black to white. Middle squeezes to dark gray and light gray. Back clusters mid-grays.
Apply across your canvas. Check harmony by squinting. Tones unify or fight. Adjust for flow. Depth emerges smooth.
Blend Blur and Low Contrast into Stunning Results
Combine both for power. Sketch rough layout first. Block foreground bold and detailed.
Layer mid-effects next. Heavy haze finishes back. Step back often. Depth pops or falls flat.
Digital masks refine edges clean. Glazes build traditional glow. Test the full stack.
Follow This Step-by-Step Process
- Draw basic shapes in pencil or rough lines.
- Render foreground with high detail and contrast.
- Apply medium blur and toned-down contrast to middle ground.
- Max out blur and minimize contrast on backgrounds.
- Refine transitions; add final tweaks.
Digital folks use adjustment layers. Painters glaze thin veils. Adapt to your setup. Results stun every time.
Spot and Fix Common Slip-Ups
Uniform blur kills depth. Everything flattens. Vary amounts per layer.
Harsh cuts scream fake. Feather blends soft. Zoom out hourly. Use a viewfinder card.
Compare to real photos. Adjust off photos of valleys. Experiment fixes most woes. Keep pushing.

See the step-by-step build here.
Blur and low contrast unlock depth anyone can grasp. Your sketches turn flat to spatial quick.
Grab paints or stylus now. Test a simple landscape. Share your before-and-after in comments below. What scene will you haze first? Subscribe for more hands-on art tips. Paint deeper today.